Ages 11-13
One Point Perspective Shapes

Skill Builders:
-Line
-Shape
-One Point Perspective
-Collage
-Mixed Media
-Vanishing Point
-Pattern
-Tints/Shades
-Color Schemes
Supply List:
-9 by 12 White Paper/Copy Paper
-Ruler
-Pencil
-Eraser
-Markers, Crayons, or Colored Pencils
-Black Sharpie
-Cardboard
-Glue Bottle
-Glue Stick
-Scissors
-Magazine or Newspaper
-Mod Podge (optional)
Alternative Supply List:
-If you do not have a sharpie you can use a black marker, black crayon, or black colored pencil
-If you do not have a ruler use a solid object with a straight edge such as a book, magazine, etc.
-If you do not have cardboard you can use paper (thicker preferred), or another flat surface you can glue onto
-If you do not have a glue bottle just use a glue stick, if you do not have a glue stick just use a glue bottle, if you don't have either then use another form of glue you do have
-If you do not have a magazine or newspaper use a paper that has written text on it (make sure it doesn't have confidential information - you don't want people to learn that information from reading your artwork! Also make sure it is not a paper you need to keep because it will be cut up) If you can't find any paper with text on it. Take a paper and write a page long of words. It doesn't have to be full sentences, any words you want.
Overview:
During this project, you will learn about one point perspective and how to take shapes and make them look like they are popping out of the paper. We will discuss what a vanishing point is and why it is really important in one point perspective artwork. We will discuss pattern, shades/tints, color theory, and so much more in this fun project!
Project Directions:
Step 1:
Start your artwork by creating a dot in the center of your white paper. This is dot represents the vanishing point. The vanishing point is the point that everything appears to vanish into the distance. In this case it will be the spot where our shapes pop out from. Then draw shapes surrounding the dot. It can be any shape you want: square, circle, heart, hexagon, block letter, etc. Complete this step in pencil.

Step 2:
Trace all of your shapes with a black sharpie. If you do not have a black sharpie look at the alternative materials list for alternate options. You can make your traced lines thin or thick and add details such as the dots I added. Remember to trace your vanishing point (dot). Erase all pencil lines still visible.

Step Three:
I recommend using a pencil for this step then once done take a black sharpie and trace your pencil lines after. Remember if you do use pencil and then trace your lines, always erase any visible pencil lines later. Take a ruler and draw a line from the vanishing point (dot) to the corners of the shapes…. But wait before you get started you might notice that some shapes don’t have corners and some shapes on my example have corners that are not connected to the dot.
There are a few simple rules that will you need to follow to create a successful artwork:
First: Start with the shapes closest to the dots.

Second: Take your ruler and line up the dot to the corner of the shape if the line goes from the dot to the corner with no interruptions you’re all set to draw the line...


...if the line goes from the dot to the corner but bumps into a shape along the way STOP when you get to the shape do not go through the shape…

...if the corner is in the back of the shape and the line would completely cut across the shape in order to appear then it doesn’t get drawn…
Third: Rounded shapes that don’t have corners get imaginary corners… shapes that this would apply to include circles, ovals, hearts, etc.
Circles and Ovals: these shapes will always get two imaginary corners on their left and right edge.


Hearts: if the bottom or top of the heart is facing the dot it will get two imaginary corners but if the side of the heart is facing the dot it will get one imaginary corner.
Step Four:
Color your artwork! Don’t worry about coloring in the background because the next step is cutting. You have many options when coloring you can create designs, use tints/shades, or even a color scheme.
Add designs and color:


Pure Color
Example: Blue
Tint
Example: Light Blue
Shade
Example: Dark Blue
Use Tints and Shades:
This can be done with just one color or several color. This technique works best with colored pencil or crayon. For the pure color color normally. For the tint, color/press light. For the shade, color/press hard.
Use a Color Scheme:
-
Neutral (Black, White, Gray)
-
Warm Colors (Red Orange, Yellow)
-
Cool Colors (Blue, Green, Purple)
-
Primary Colors (Blue, Yellow, Red)
-
Monochromatic Colors (Tints and Shades of one Color)
-
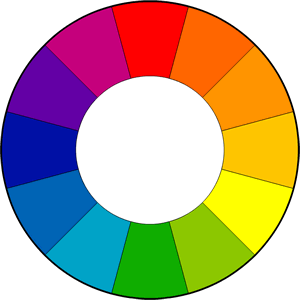
Analogous Colors (Three Colors Next to Each Other on the Color Wheel)
-
Complementary Colors (Opposites on the Color Wheel, ex. Red/Green)
Step 5:
Cut out your artwork. Try not to cut the shapes apart if they do get cut apart keep all the shapes and you can fix it during the last step.

Step 6:
Cut out a piece of cardboard to 10 by 10 inches. You can use an alternate size or alternate material if needed (look at the alternate supply list). Cut and glue (with a glue stick) pieces of magazine or newspaper with text. The text should be approximately the same color and size and with a light colored background for the best results. This portion of the project is the background for the shapes we previously created. We are using text so that the shapes stand out from the background.

Step 7:
Cut small pieces of cardboard and glue (with a glue bottle) them onto the back of the shapes. This will help the shapes pop out a bit from the background. I like to layer two pieces of cardboard for increased depth from the background. You can add as many layers as you want or skip this step. For the best results try not to have the cardboard show when finished. Put glue between the paper and cardboard and between every layer of cardboard. Add cardboard to all shapes even if the shape got cut apart from the other shapes.


Step 8:
Glue the shapes to the background. If you added cardboard put glue on all of the cardboard pieces. I put my shapes down on my background and lifted section by section to add glue. Try this technique if you would like. Glue all your shapes down. If any shapes got separated during the cutting step. Glue these shapes down too.
