Ages 8-10
Futuristic Foil Figure
Skill Builders:
-Proportion
-Futurism
-Color Mixing
-Implied Movement
Supply List:
-Aluminum Foil
-Hot Glue Gun & Hot Gun Glue Sticks
-Flashlight
-Pencil
-Eraser
-Markers
-Black Sharpie
-Scissors
-9 by 12 White Paper (preferably thicker paper)
-Tape Measure (Optional)
Alternative Supply List:
-If you don’t have a hot glue gun use tape
-If you don’t have markers use a different coloring material such as colored pencils
or crayons
-If you don’t have a black sharpie use a different colored sharpie or a marker
-If you don’t have a 9 by 12 white paper use a different sized or different colored
paper.
-if you only have thin paper then you will need cardboard
Overview:
During this project your child will learn about proportion and implied movement as they construct a human figure out of aluminum foil. After gluing their figure to a piece of paper they will learn about the art movement Futurism. As a part of the coloring process of the project, your child will review or learn about color mixing.
Project Directions:
Step One:
Cut a square/rectangle piece of aluminum foil. Draw the lines on your piece of aluminum seen in the picture below. I recommend drawing these lines in black sharpie. You can additionally write the words if desired. Then cut on the lines.

Step Two:
Crumple the sections then crumple then crumple some more. If your arms or legs or too long or if your torso is too small fold the legs and arms into the torso. When you are creating the figure think about proportion. Proportion is an art term meaning parts compared to the whole. This means that every part of the figure needs to be the right size compared to the other parts. For example if an adult had a regular sized body but hands the size of a baby and a head the size of the elephant they would look really silly because their hands and head are not in proportion with the rest of their body.


Additional Learning Opportunity:
Measure the height of your body with a tape measure with the help of someone else. Now measure the height of your head, how does the height of your head compare to the height of your body? Measure the person helping you. How does their height and head height compare? Remember adults and children have different proportions! Now try measuring your arm span and your height, how do they compare? Try measuring other parts of your body compared to each other, your arm to your leg, your head and torso compared to your legs, etc.


Step Three:
Move your figure so it has implied movement. Implied movement means that your figure appears to be moving but is not actually moving. Have you ever played freeze dance? This is an excellent example of actual versus implied movement. Freeze dance is a game where you dance to music and then freeze when the music is paused. While you are dancing you are actually moving but when you are frozen in that dancing position while the music is paused you are implying movement. In order to create implied movement in your figure first bend the arms and legs at the elbow and knee. Then bend the waist and/or twist the hips. Once you pick your implied movement position for your foil figure move onto the next step.
Additional Opportunity:
-Play Freeze Dance and try some of the positions you were stuck in on your foil
figure
-Try acting out different implied movement positions… are you throwing a ball,
running, jumping over a hurdle, jumping in the air. Have someone take a picture and
see which positions show the best implied movement. Try some of the positions on
your foil figure.


Step Four:
With adult supervision use a hot glue gun to glue your figure onto a piece of white paper. Your figure should be glued towards the front short edge of the paper. If your paper is too thin and is not strong enough to hold up the figure, glue a piece of cardboard (the size of the paper) under the paper. Additionally you can use the hot glue gun to fix any parts of the figure that are not strong for example if a leg is falling off, or if you bent the arms and legs into the torso like I did then you will want to glue them so they stay bent.
Step Five:
Use a flashlight or other direct and strong light source to shine a light onto your figure and paper. The shadow of the figure should be on the paper. A steady light that is not moving is better. I turned on my phone flashlight and put my phone on a tripod to shine a light on my figure and paper. Someone holding the flashlight is less ideal because if they move they can move the shadow. Trace the shadow with a pencil. Move the flashlight to create a new shadow shape and trace it. Repeat this step until you have several shadows traced. The shadow tracings should overlap. I traced four shadows in my example. Once you finish tracing the shadow take a picture of the shadow and tracing before you move the light source in order to make the next step easier.


Additional Learning Opportunity:
The tracings in step 6 are inspired by the art movement Futurism.
“Futurism was an art movement of 20th century Italy. Using various types of medium, futurist artists used emphasized themes of the contemporary social issues of the time connecting specifically with the future. These themes included ideas based on the increasing speed of technology, automobiles and airplanes of the industrial revolution… Futurism focuses on the movement of the object within the piece, manipulating and overlaying an image several times to understand the motion and movement it creates. Colour, line and shape become very important in Futurist works, for the importance is on how the object moves throughout the canvas. Many futurist works appear abstract.”


Step Six:
Trace each shadow with a different color marker. Use blue, yellow, red, orange, green, or purple. The simplest colors to choose are yellow, red, and blue. If your color is light like yellow, I recommend lightly erasing the pencil lines so you can still see them but it won’t show through the marker. If you choose to erase the lines, erase a little section at a time. If you choose not to erase the lines beforehand erase any pencil lines left over after you trace. Use the pictures you took during the last step in order to distinguish which lines belong to which shadow tracing.
Step Seven:
Color in the shadows with the colors they were traced with. DO NOT COLOR IN THE SECTIONS THAT ARE NOT OVERLAPPING FOR NOW.
Step Eight:
In the sections where the shadows overlap use the color that would appear if the two colors mixed.
If you are using regular washable markers you can layer the colors. For example if a red and a yellow shadow overlapped you can either color the section orange or you can color it yellow and then color over the yellow with red. This tip is especially useful if you do not have the color marker needed. This technique only works with washable markers and does not work with crayons or colored pencils. Test out the colors you plan to "mix" on a seperate piece of paper first, you might like the look of red over yellow or yellow over red better.
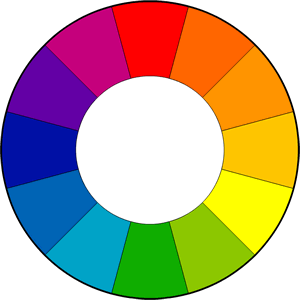
If you do not have washable markers then you need to color the sections in using the correct color without layering the colors. If a red and yellow shadow overlap, the overlapped section would be orange. Red + Yellow = Orange. Look at the combinations below to find the colors you need.
Here are the color combinations:
-Red + Yellow = Orange
-Red + Blue = Violet (Purple)
-Blue + Yellow = Green
-Red + Orange = Red Orange
-Red + Violet = Red Violet
-Blue + Green = Blue Green
-Blue + Violet = Blue Violet
-Yellow + Orange = Yellow Orange
-Yellow + Green = Yellow Green
-Three or More Colors = Brown
How do these colors compare to each other on the color wheel?


Step Nine:
Trace a line around each of the shadows using the color of the shadow closest to the line. The color of the line will change many times as you go around the shadows.


Can you see the implied movement in the drawing/coloring you created?